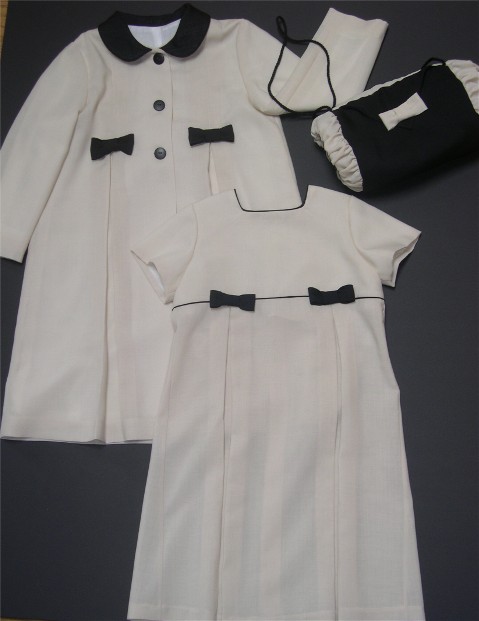
What could be a nicer way to welcome fall than with a new coat for your special girl. I’ve used our Girl’s Coat and Muff pattern for the coat and muff and made it extra special by adding a matching dress. (Ellis)
Beautiful wool/poly blend challis from Bear Threads was used for it all in oatmeal and black and Bearissima II for lining finished it off.
Girl’s Coat and Muff pattern is our newest pattern and is due to ship in a few weeks. (You can pre-order the pattern and receive FREE shipping.) This is a revised and updated version of our Toddler Coat pattern and is available in sizes 5-8 with the added fun of a muff to keep little hands warm and a pocket for bringing little treasures along.
We’ve added small bows to the front of the coat in this version and a larger bow in back.
To makes bows cut a strip of fabric 3” wide. Stitch long edges together and turn. Press. Cut a 6” length for the bow and whip short, raw ends together to form a ring. Cut a shorter piece for the bow center. Wrap this shorter piece around the ring to form ring into bow shape. Stitch raw ends together. Attach bows to the coat front at the ends of the pleats.
The dress is created using our Ellis pattern. This is a girl’s A-Line dress in sizes 3-10 but I wanted to echo the pleats on the front of the coat – so I added them. As sewers, aren’t we lucky we can do this?
I didn’t use the pattern piece for the front skirt but cut a rectangle of fabric the correct length and wider than the bodice to allow for the pleats. Find the center front of your block (the new front skirt). Measure out 3” to the left. Mark. Measure again 4-3/4” from the first mark. Mark again. Bring these two marks together to form the pleat. Baste across the top of the pleat to hold in place. Press. Repeat for the right of center front. Use the Ellis skirt front pattern piece to shape the top of your pleated skirt front so that it fits perfectly into the bodice front. Attach a bow to the top of each pleat.




 Posts


