February 22, 2011

Project Linus "Make a Blanket Day"


I was so happy to be able to be a part of the Project Linus "Make a Blanket Day" on Saturday.  I wish I had remembered to bring a camera because the organization and cooperation among those participating (approximately 50) was awesome!

Thanks to your generosity we were able to bring some completed blankets with us! 

Their goal was to complete 100 blankets during the 5-hour event.  The previous event (this chapter usually has 3 per year) they completed 160 blankets.


The participants were all busy at work in specific work groups. 

There were many quilt tops or whole cloth tops waiting.  The quilt tops are completed ahead of time and are brought to this event.  (This group meets once a week to complete tops, or work on other types of blankets - crocheted or knitted.)  Some quilt tops were complex, some were whole cloth panels, some were simple block patterns. 

These completed quilt tops were given to a group where batting and backing were cut and pinned to it. 

Quilts then travelled to the sewing area where many angels with machines were at work attaching labels, sewing 3-1/2 sides together and then turning the quilt like a pillowcase.  The quilt was then top-stitched near the outer edge to give an appearance of a binding and a more finished look.


The quilts were then sent to the pinning table where workers (surrounded by tubs of safety pins and straight quilt pins) were deciding whether a quilt would be machine quilted or tied.  Safety pins told "tie-ers" where to tie and straight pins guided the machine quilters.  

Most quilts were hand tied.  The tables of hand tie-ers looked like an old-fashioned quilting bee.  Quilts of all sizes and colors were surrounded by smiling people hard at work. 

Thanks to generous donations, the room was stacked high with completed quilts, bolts and bolts of fabric and batting and other notions. 


To add to the fun there was food and a door prize drawing every 30 minutes or more. 

While quilt tops are completed before the event there was some crocheting and knitting going on, as well.  What a fun way to spend an afternoon.   


What a wonderful use of fabric scraps and stash!  If you'd like to help there are many ways.  Project Linus can always use:

1.  Completed blankets (sewn, crocheted or knitted).  

2.  Quilt tops or whole cloth tops.

3.  Fabric donations.

4.  Sewing notion donations.

5.  Cash donations.  Send to Project Linus HQ.

Send quilts to us (we'll make sure they get to the right people) or to your local Project Linus chapter. 

The Karen Faylor Company
PO Box 112
9800 Harbour Place, Suite 204
Mukilteo, WA  98275

November 15, 2010

The Velveteen Coats and Bonnets

Guest blogger, Sara Norris, shares her story of The Velveteen Coats and Bonnets...


I have wanted to make my two granddaughters precious coats and bonnets since they were born. I had envisioned them wearing these once they got to be toddler age.  (The look I had in mind was just not the same effect when they were "babes in arms".)  I think I may have had the Shirley Temple syndrome! 


So this Christmas, as they are approaching 18 months and 2 years old, seemed to be the time to outfit them in the proper outerwear for toddler girls. 

Even though I had to put myself through what many seamstresses do ... going through the pattern stash... looking online for pattern after pattern... I went back to my favorite design of The Karen Faylor Company... Toddler Coat and Bonnet.


This pattern is such a classic and just what I had envisioned for my sweet girls. 

Never one to enjoy making two-of-a-kind of anything, now that I have these two little girls I feel compelled to do that very thing!


I decided upon a very fine cotton velveteen as my fabric.  Powder pink for Lacie and powder blue for Millie.  I lined the blue in ecru satin and the pink in white satin.  For the bonnets I gathered silk satin ribbon and stitched it onto the seam just under the brim to frame those adorable little faces.  The effect is charming!

Even though I had made this pattern before, it had been some years and, frankly, I felt a little intimidated at the task!


Never fear!  This pattern goes together beautifully and rather quickly! 

The coats and the matching bonnets are now finished and ready for me to wrap in coat boxes tucked into tons of tissue and tied with big red Christmas bows! 

I can hardly wait until Christmas!

The Toddler Coat and Bonnet pattern contains sizes 1-4.  Our Girl's Coat and Muff pattern is the same coat and contains sizes 5-8.

October 27, 2010

Little Red Riding Hood


Jerry Roberts used our Savannah Pinafore pattern to help create Little Red Riding Hood's perfect look.


Instead of Savannah's ruffle, Jerry bound the edge in a microcheck bias to match the piping that she used on the collar and cuffs.


After Jerry adds the basket lined in red gingham and filled with goodies she'll be ready to head to Grandma's house.

Click here to see the Savannah pattern.

September 12, 2010

Girl's Coat and Muff With Matching Ellis


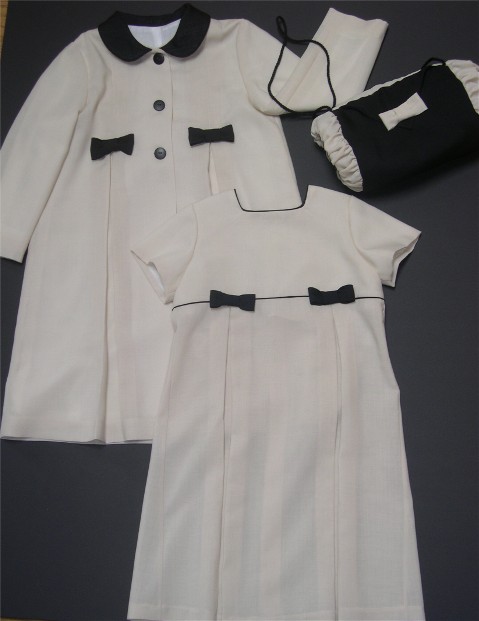
What could be a nicer way to welcome fall than with a new coat for your special girl. I’ve used our Girl’s Coat and Muff pattern for the coat and muff and made it extra special by adding a matching dress. (Ellis)


Beautiful wool/poly blend challis from Bear Threads was used for it all in oatmeal and black and Bearissima II for lining finished it off.

Girl’s Coat and Muff pattern is our newest pattern and is due to ship in a few weeks.  (You can pre-order the pattern and receive FREE shipping.)   This is a revised and updated version of our Toddler Coat pattern and is available in sizes 5-8 with the added fun of a muff to keep little hands warm and a pocket for bringing little treasures along.

We’ve added small bows to the front of the coat in this version and a larger bow in back.

To makes bows cut a strip of fabric 3” wide. Stitch long edges together and turn. Press. Cut a 6” length for the bow and whip short, raw ends together to form a ring. Cut a shorter piece for the bow center. Wrap this shorter piece around the ring to form ring into bow shape. Stitch raw ends together. Attach bows to the coat front at the ends of the pleats.

The dress is created using our Ellis pattern. This is a girl’s A-Line dress in sizes 3-10 but I wanted to echo the pleats on the front of the coat – so I added them. As sewers, aren’t we lucky we can do this?

I didn’t use the pattern piece for the front skirt but cut a rectangle of fabric the correct length and wider than the bodice to allow for the pleats. Find the center front of your block (the new front skirt). Measure out 3” to the left. Mark. Measure again 4-3/4” from the first mark. Mark again. Bring these two marks together to form the pleat. Baste across the top of the pleat to hold in place. Press. Repeat for the right of center front. Use the Ellis skirt front pattern piece to shape the top of your pleated skirt front so that it fits perfectly into the bodice front. Attach a bow to the top of each pleat.

August 29, 2010

Beginning a New Project

I love beginning a new project.


It's like starting a new year, a new season, a new week or a new day.  Everything feels fresh and fun.  The anticipation of seeing a vision take form is exciting!


My next project is for Bear Threads.  Don't you love their beautiful fabrics?  Click here to go to Bear Threads Ltd.


In her book, "The Creative Habit" Choreographer Twyla Tharp talks about the "rituals of preparation".  She says, "It's vital to establish some rituals - automatic but decisive patterns of behavior - at the beginning of the creative process, where you are most at peril of turning back, chickening out, giving up or going the wrong way."


Here is how I prepare:


1.  CLEAN MY WORKROOM - I have a nice, bright workroom with a large work surface that attracts clutter.  Even though it is 50" x 70" there is usually only a 2" x 3" size area of available space.  Clutter kills my creative process.  I put away everything that isn't related to my new project or my sanity - like my cat and my Project Runway DVDs.


2. FINALIZE DESIGN - Sketching my final design helps to clarify it in my mind.  I can still change my mind about the design during the construction phase of the project but having the design clear in my mind and on paper will give my journey a real destination.  It is also a reminder of what notions I might need.


2.  PREPARE FABRICS - Do they need to be pre-washed, steamed or pressed?  


3.  TRACE THE PATTERN - For this project I am using our newest pattern - Girl's Coat and Muff (so cute) - which has not returned from the printer yet.  I need to trace a copy from our original.


4.  GET NOTIONS TOGETHER - Isn't it frustrating when you discover you're out of something during one of those late night sewing sessions?  I like to wind enough bobbins to get me through the whole project if possible.  This also helps me evaluate whether I'll have enough thread or not.  I will need two colors for this project.  Interfacing?  Buttons?  Elastic?  Piping?  Write it down and check your inventory.


5.  MAKE PIPING - After I've cut out all the pattern pieces on the fabric I'll start making the piping - if I'm not using packaged, ready-made piping (a wonderful invention).  Bias strips take up a bit of yardage - so be sure you have enough fabric for the garment before you start cutting bias strips.  The strips for piping can be easily pieced if necessary.

Out of all these beginning steps - only one is a real "ritual" for me  - cleaning my workroom.  Once I've done that the path has been cleared and it's safe to begin!

What are your "rituals of preparation" and the step you take before beginning a new project?

Girl's Coat and Muff pattern will be available for pre-order soon.  Watch our website.  Click here.

July 22, 2010

Linda's Ellis


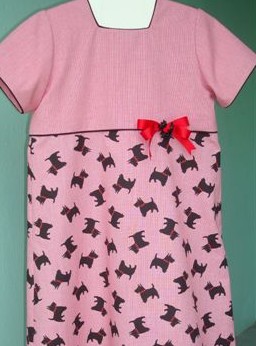
Little Scotty dogs play all over the skirt of Linda's Ellis. 

How cute is the raised waistline accent?  She added a red ribbon bow and Scotty dog button.  The back buttons all the way from neckline to hem with Scotty dog buttons.  

This reminds me of our neighbor walking his 3 black Scottish Terriers in the evening.  His dogs are as cute as these!  They are all the same size - like 3 little buttons.


Linda changed the sleeve a bit by using the sleeve pattern as the sleeve lining as well.  (The Ellis pattern includes a separate pattern for the sleeve lining which finishes the sleeve without a "hem" for a nice, clean look.)  This way she was able to add piping to the lower edge of the sleeve.  Good idea, Linda!
i love how Linda used a print for the skirt and a solid for the top.  Her use of piping at the waistline area, neckline and sleeve edges gives her Ellis a very polished look.

Thank you, Linda, for showing us how piping and buttons add something really special!

Ellis is a girl's A-line dress pattern containing sizes 3-10 in one envelope.

July 15, 2010

Jerry's Ellis

Jerry Roberts has such fun sewing.  You can see it in everything she creates.

Her latest creation from our Ellis pattern is no exception. 

Her whimsical eye and attention to detail make her designs unique.

She created Ellis in an adorable daisy print poplin and accented the raised waistline with a white waffle pique band and daisy.  The daisy was crafted by using her embroidery machine for the center and she then took apart a silk daisy for the petals.  She pinned the flower to the band so that it could be easily removed. 

Jerry adds, "I can see lots of potential for cute little Sunday School dresses in the fall!!" 

Jerry, you've inspired us again.