July 22, 2010

Linda's Ellis


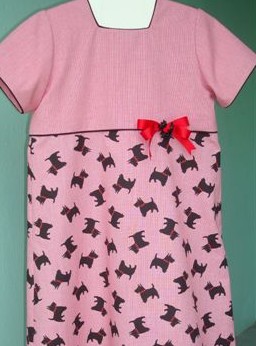
Little Scotty dogs play all over the skirt of Linda's Ellis. 

How cute is the raised waistline accent?  She added a red ribbon bow and Scotty dog button.  The back buttons all the way from neckline to hem with Scotty dog buttons.  

This reminds me of our neighbor walking his 3 black Scottish Terriers in the evening.  His dogs are as cute as these!  They are all the same size - like 3 little buttons.


Linda changed the sleeve a bit by using the sleeve pattern as the sleeve lining as well.  (The Ellis pattern includes a separate pattern for the sleeve lining which finishes the sleeve without a "hem" for a nice, clean look.)  This way she was able to add piping to the lower edge of the sleeve.  Good idea, Linda!
i love how Linda used a print for the skirt and a solid for the top.  Her use of piping at the waistline area, neckline and sleeve edges gives her Ellis a very polished look.

Thank you, Linda, for showing us how piping and buttons add something really special!

Ellis is a girl's A-line dress pattern containing sizes 3-10 in one envelope.

July 15, 2010

Jerry's Ellis

Jerry Roberts has such fun sewing.  You can see it in everything she creates.

Her latest creation from our Ellis pattern is no exception. 

Her whimsical eye and attention to detail make her designs unique.

She created Ellis in an adorable daisy print poplin and accented the raised waistline with a white waffle pique band and daisy.  The daisy was crafted by using her embroidery machine for the center and she then took apart a silk daisy for the petals.  She pinned the flower to the band so that it could be easily removed. 

Jerry adds, "I can see lots of potential for cute little Sunday School dresses in the fall!!" 

Jerry, you've inspired us again.

June 20, 2010

Voile Venice


You may not recognize this as our Venice pattern.  A very simple change was made to create this pink Swiss voile and white linen version of Venice.


We cut the Venice top off at the "lining" point on the pattern then added rectangles of fabric for the front and back skirt pieces.  For this size 4 we we cut the voile about 9" x 2 times the width of the front and back yokes.  The linen was cut slightly shorter.   

Stitch the side seams of the Venice yoke and the side seams of your skirt pieces.  We wanted to keep the voile overlay out of the way of the back button area so it was trimmed and narrowly hemmed at the back edge.   Finish skirt edges of the Venice top with narrow hems.  Gather the skirt and attach to bodice matching center front and side seams. 

Then just complete the top according to the instructions.  Ruched piping was used as an accent.  Love the uneven, bunchy look of it.


To construct the flowers cut 5 bias strips of voile 1" wide by 6" long and 5 bias strips of voile 3/4" wide by 6" long. 

Beginning with one 1" strip stitch, by hand, the short edges together to form a ring.  Stitch a running stitch along one long edge and pull up to form flower.  Stitch together in the center.  Repeat with 3/4" wide strip.  Lay smaller flower on top of larger flower and hand stitch together in center.  Attach 3 pink pearls to center of flower.  Repeat for the other 4 flowers.  Stitch to Venice top. 

In the next few days we'll post the white linen capris that will complete the look.

June 7, 2010

Sara's Savannah


Sara Norris of Adamsville, TN created this amazing Savannah.  Sara's style is part heirloom, part afternoon tea and all girl. 


You can really see the Savannah in this Savannah!  Sara even added an extra ruffle on the ruffle.

To create this added ruffle on the ruffle seam line and also on the bloomers, Sara cut 1" bias strips and gathered them down the center and attached to Savannah's ruffle and on the back of the bloomers.  Can you just see your toddler in this?


Sara used a Swiss pima cotton for most of Savannah but used a pre-tucked voile for the bodice.  On the bodice she also added a bit of tatting and a mother-of-pearl button.

Sara says, "I just have to say that you do a wonderful job on your patterns. the instructions were great, all very easy to follow and I was thrilled with the result!!!"


"I have two granddaughters, 15 months and 1 year, that I was thinking of when I came up with this. I thought this would be precious for beach photos."

Thank you, Sara, for your inspiration!

May 28, 2010

Linda's Savannah

Linda Steinhoff of Bermuda created this delightfully frilly Savannah.  We loved her choice of fabrics and the special details that she added made this Savannah uniquely "Linda".   
For extra cuteness, Linda added ruffles to the back of the bloomers.  She cut 1-1/4 inch strips of a coordinating fabric and finished them with a rolled hem.  She gathered them in the middle and stitched them to the back of the bloomers.  She left about 1/4" between the ruffles on her bloomers, which were a size one.
Linda's other adorable detail was the loopy flower she added to the front.  To create this flower Linda used bias tubes for the petals and a 5/8" covered button for the center.  When I see something this cute and hear how simple it is I can't wait to run to my workroom and try it myself!

Linda, thank you for inspiring us!


May 21, 2010

Jerry's Savannah

Jerry Roberts of Jackson, Mississippi created an exciting Savannah for her granddaughter, Mary Kennedy. 

Jerry lowered the yoke a bit (which helped the size 6 fit her size 7 MK), added some wonderful, twirley swirls of bias and adorable buttons.   Hmmm - should this pattern be available in larger sizes?

Jerry chose a pale lime green dotted baby wale pique and turquoise twill.  She cut bias strips for her swirls, ran them through her bias maker steaming the strips and her fingers :-) .  She used a template for her swirls and traced them onto her fabric.  She pinned her bias in place, then lifted the bias to use dots of fabric glue (Roxanne's Glue Baste) to hold the bias before stitching in place with a 4.0 dougle needle.  She added 3/8" bright pink buttons at the bottom of each loop to add some interest and a 3rd, accent color.  She plans to accessorize Mary Kennedy's total look with a bright pink hair bow.  How cute is that!

Here is what Jerry said about using the Savannah pattern...

"I thought the directions were very concise, well written, and easy to understand."

"I loved the way the back yoke encased the top edges of the ruffles on each side."


"I must say that I’ve NEVER had such wonderful results with a neck or arm binding as I did on this garment! YAY!!"

We loved Jerry's Savannah!  She has a style that is uniquely her own. Thanks for sharing this, Jerry!  

Jerry is also going to work her magic with our new  pattern - Ellis.  We can't wait to see what she does with it! 

Click here to see Savannah, Ellis and our other patterns.

May 16, 2010

Ruched Piping


Add a fun addition to your next project with ruched piping.

You need piping cord and bias strips.  Piece together your bias strips to form one long strip.

It's easy to do.  Begin with a l-o-n-g bias strip.  You will need 2 to 3 times the length you would with regular flat piping.

Fold your bias strip in half enclosing the piping cord and stitch close to the cord - but not too close.  You want a little room to be able to scrunch up the fabric on the cord.

Stitch across one end of your piping strip through the cord.  This will hold the cord while you scrunch and prevent the cord from pulling out.  

Place your unscrunched piping back into the machine.  Use a "needle down" position so that when you stop stitching and raise your presser foot the needle will hold your piping in place.

Now begin the scrunching and sewing.  Raise the presser foot and scrunch your fabric along the cord to the desired fullness.  Lower the presser foot and stitch, using something like a shishkebab stick to control the fabric as you stitch.  Continue scrunching and stitching, raising and lowering the presser foot until you have enough piping. 

Try this technique using purchased piping.